A Step by step guide to
setting up POI's on your TomTom. This is for users of our FREE
downloaded POI's. This method uses file copying in windows. If you
are not happy with files and folders, we suggest you get someone to
assist you.
All POI files that you will use on the
TomTom come in pairs. There is a data file that contains all of the
locations and a bitmap file that contains the icon that you see on the
tomtom's screen. Together these files make up a POI
"set" and sometimes there may also be a .TXT file included. This
text file is
optional and is only for information purposes.
ON our websites
we "ZIP" these files together into a package to make downloading quicker
and easier. These POI then require "UNZIPPING" prior to use, so if you
have downloaded POI from the website please "UNZIP" them to a directory.
If you bought the POI disk you can ignore this step, as all of the files
are in directories already unzipped.
Plug the
TomTom into the PC using the USB cable and then power on the TomTom. If
TomTom HOME starts up - close it down as it won't be used. Click on
Start then My Computer, a screen similar to the one below
should appear;
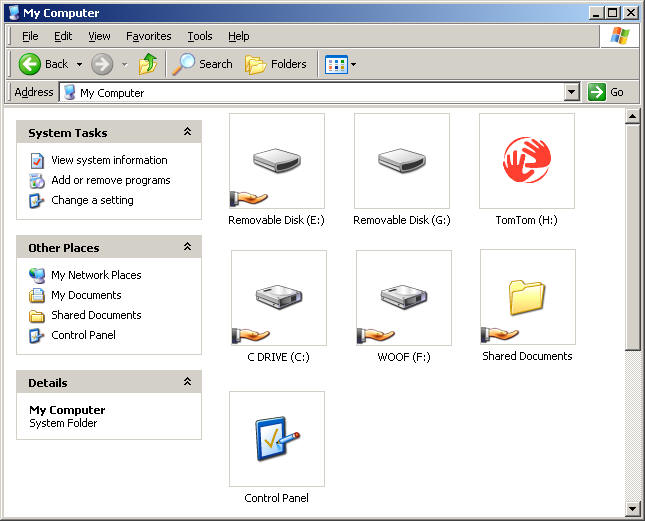
The
tomtom will be displayed either as the red hands, a small version of the
TomTom or other easy to identify icon. It will also be clearly labelled
as TOMTOM so you can identify it. If not then re-check your cabling and
the USB plugs, then try turning the TomTom off and on again to see if
this helps the PC to recognise it.
With the
TomTom being identified, the target folder for the POI files to be
copied to now has to be located. To do this double click on the
TomTom device (in our example above its H: yours may be a different
letter). Inside will be a number of folders and files, if your window is
full of large icons rather than an easy to read list (like below) then
you need to click on the View menu at the top of the window and then on
Details. This will give you a view similar to that below with small
icons and a more manageable list.
Below
you can see the directory structure of the TomTom as well as files
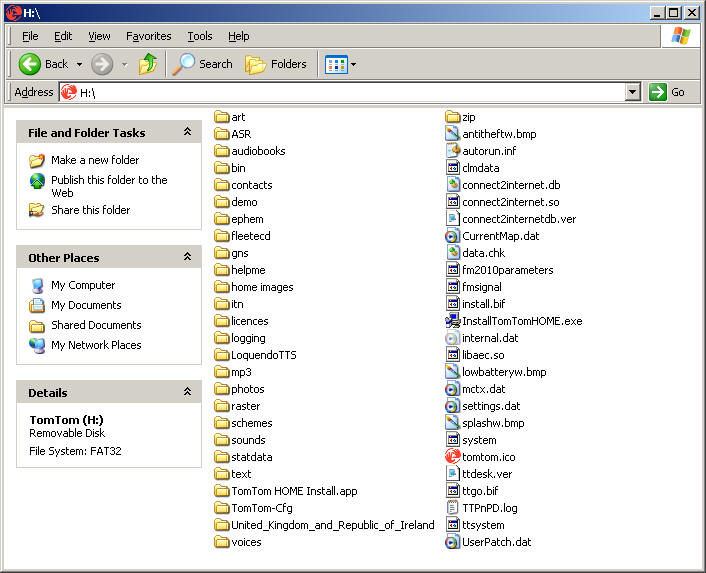
The
folder that is relevant in this example is the United_Kingdom_and
Republic_of_Ireland and its here that the POI files will be copied to.
The name of this folder varies between TomTom models as it depends upon
what maps you have installed.
x:\Great_britain_map
x:\Great_Britain-Map
x:\Great_britain_plus-map
x:\Western_Europe-map
x:\United_Kingdom_and_Republic_of_Ireland
x: will be a different drive letter on your machine,
substitute what's relevant. Your folder may not be listed above at all, sop we
still need a way to be certain which folder is the correct one. The
folder will be called after the name of a place, country or countries
e.g. Western Europe, Ireland, UK , Great Britain etc. It will also often
have the word MAP in it (but not always). Finally when you think that
you have located the right folder open it up. If needed you can select
View - Details fro a more manageable view.
Try and
find a file called POI.DAT (on some machines this will be just POI),
there will also be the file CLINE.DAT (or just CLINE) inside.
If these two files are inside the folder then you have the correct
location. If not then try another folder until you locate the right one.
This is now the "target" directory into which the POI files "sets" will
be copied.
Return
to the directory where you stored the unzipped POI files in Step 1: and
copy them over to the directory you found above. To be clear you should
copy the two files that make up the POI over, one at a time into the
target directory, if using the CD ROM do not copy the POI folder over
from the CD, but the contents of the folder. If using files from the
website don't copy the ZIP file over, but the .OV2 and the .BMP files
inside the ZIP file.
You should now have the .BMP file and
.OV2 file in the directory along with the other contents already there.
NOTE:
Older tomtom software versions had a very low limit on the number of POI
categories you could use, of between 29 and 49. After version 6 of the
TomTom software this was increased to 100 POI categories. If you want to
use a large number of POI categories we advise that you use the latest
version of TomTom HOME and update your software to version 6 or later
(you can download TomTom HOME for free).
The
files you chose should now have been copied over and be inside the
target folder. IN our example we chose Car Parks and Homebase, and you
can see that Car-Parks.OV2 and Car-Parks.BMP as well as HOmebase.OV2 and
Homebase.BMP are inside the target folder.
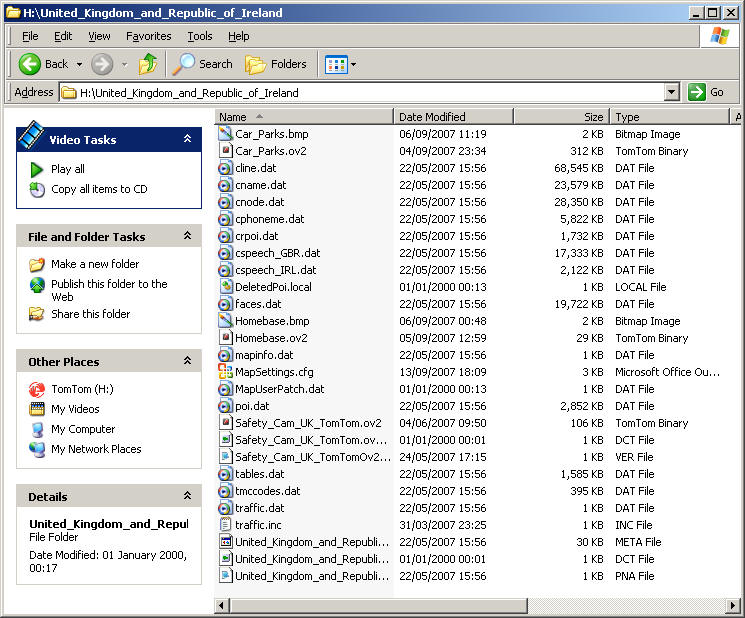
In the
example picture above you can see the POI.DAT and CLINE.DAT files which
indicate this is the right folder to use. You can also see the two POI
file "sets" copied over: Car Parks (Car_Parks.OV2 & Car_Parks.BMP) and
Homebase (Homebase.OV2 & Homebase.BMP). Now power down the TomTom and
unplug the USB cable from the TomTom and the PC.
Turn on the TomTom and
from the "drive" screen tap in the middle to get to the Main Menu
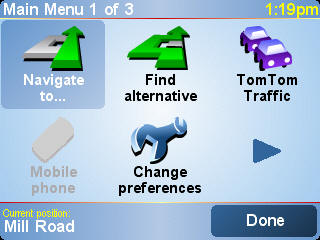
Click Change
preferences for the next screen
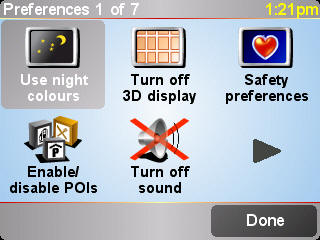
Now click on "Enable/disable POIs" and you will see a POI list, indicating that the
newly installed POI categories have been correctly installed. In our
example you can see that "Car Parks" and "Homebase" are listed. They
also have a tick next to them which indicates that they are "active",
make sure that all POI categories you want to use are ticked.
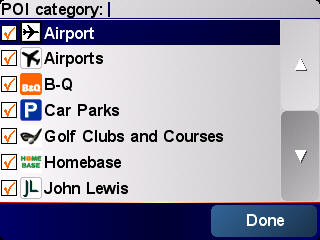
Finally click Done
to return to the "drive " screen. Congratulations you have installed the
new POI categories and they are ready to us.