
HGVSOLUTIONS.COM – QUICK START GUIDE DOWNLOAD
Step 1: QUICK
OVERVIEW OF USING LOW BRIDGE DATA
Step 2: Checklist
of software and equipment needed
Step 3: Using Garmin POI LOADER and choosing the Low
Bridge POI Files
Step 4: INSTALL
THE OTHER 2 LOW BRIDGE POI FILES
Step 5: CONNECT & INSTALL THE POIs
Step 6: TESTING & READY TO USE
OTHER TRANSPORT DATA ON DOWNLOAD
GARMIN COMPATABILITY LIST
This
document describes the initial installation and subsequent updating of a POI
set on the Garmin series of Personal Navigation Devices. These instructions are
for the Garmin;
- Quest 2
- GPSMAP 60CSx, 76Cx,
76CSx, 496
- eTrex Venture Cx, eTrex Legend Cx, eTrex Vista Cx
- iQue M3, M4
- Nui 200, 250, 260,
270, 310, 350, 360, 660
- StreetPilot c310,
c320, c330, c340, c510
- StreetPilot i2, i3,
i5
- StreetPilot 2720,
2730, 7200, 7500
- zumo
USER TIP: Most
recent Garmin devices are supported, and the list above may be superseded as
new devices are added. If you are unsure if the device is supported then please
email us and we will verify. We suspect that all Garmin’s
made after July 2007 will support additional POI’s. If you are unsure as to which version you have on your device then
please check in the ABOUT screen.
Step 1: QUICK OVERVIEW OF USING LOW BRIDGE DATA
Quick Overview
There are 6 easy steps to using this Landis Media
Ltd – Fleet and Low Bridge Data with your Garmin. If you get stuck then refer
to the TROUBLESHOOTING section on the website.
This first step introduces
you to using Low Bridge POI data and an overview of the system in use. Make
sure you read this step because the background given will help you decide which
POI files you will need later. We give two EXAMPLES
to demonstrate how in practice Low Bridge POI warnings work.
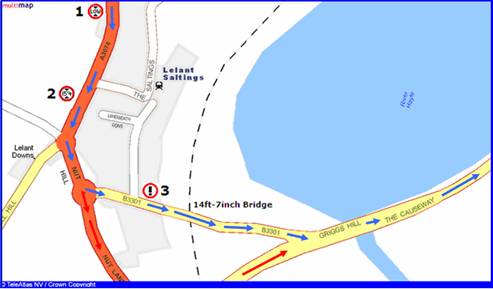
NOTE: The maps below are just for illustration
purposes and not taken from a Garmin unit. You can see similar style maps on
your Garmin device and this is demonstrated later.
Example 1: You have a 15ft 4inch cab height and your vehicle can’t
fit under the 14ft 7inch
Please follow step by step
what happens on the picture above:
![]() You follow the route that
the Garmin has planned (shown by the BLUE arrows)
You follow the route that
the Garmin has planned (shown by the BLUE arrows)
![]() You are 2km from the
Bridge at Point 1 – you hear and see
the POI alert for the All_Low_Bridges_Data POI
You are 2km from the
Bridge at Point 1 – you hear and see
the POI alert for the All_Low_Bridges_Data POI
![]() This warning tells you that
a bridge is coming up and that you need to listen out carefully for further
warnings over the next 2 KM. You continue to drive
This warning tells you that
a bridge is coming up and that you need to listen out carefully for further
warnings over the next 2 KM. You continue to drive
![]() You are 1.5km from the
Bridge at Point 2 – you hear and see
15ft 4inch Low Bridge POI warning (for your cab height). You know your vehicle won’t
fit under the Bridge ahead and that you will need to choose a new route.
You are 1.5km from the
Bridge at Point 2 – you hear and see
15ft 4inch Low Bridge POI warning (for your cab height). You know your vehicle won’t
fit under the Bridge ahead and that you will need to choose a new route.
![]() You choose an alternative
route using the Garmin (shown by the RED arrows) and divert off the old route at
Nut Hill roundabout. This takes you down
You choose an alternative
route using the Garmin (shown by the RED arrows) and divert off the old route at
Nut Hill roundabout. This takes you down
![]() You rejoin the planned main
route (BLUE arrows) at Griggs Hill and continue your journey as planned.
You rejoin the planned main
route (BLUE arrows) at Griggs Hill and continue your journey as planned.
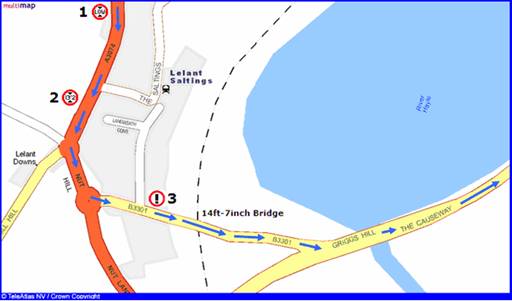
Example 2: You are now in a truck
with a 13ft 2inch cab height. You can easily fit under the 14ft 7inch
Please follow step by step
what happens on the picture above:
![]() You are 2km from the Bridge at Point 1 – you hear and see the POI alert for the
All_Low_Bridges_Data POI
You are 2km from the Bridge at Point 1 – you hear and see the POI alert for the
All_Low_Bridges_Data POI
![]() This warning tells you that a bridge is coming up and that
you need to listen out carefully for further warnings over the next 2 KM. You
continue to drive
This warning tells you that a bridge is coming up and that
you need to listen out carefully for further warnings over the next 2 KM. You
continue to drive
![]() You are now 1.5km from the Bridge at Point 2 – this time you don’t hear or see any warning, why not ? Your
cab height in this example is 13ft 2inches and so will fit easily under the
14ft 7inch railway bridge ahead. Since you don’t hear any warning you can keep
driving confidently following the planned route (Blue arrows)
You are now 1.5km from the Bridge at Point 2 – this time you don’t hear or see any warning, why not ? Your
cab height in this example is 13ft 2inches and so will fit easily under the
14ft 7inch railway bridge ahead. Since you don’t hear any warning you can keep
driving confidently following the planned route (Blue arrows)
![]() You are now 100m from the Bridge at Point 3 – you then hear and see the Alert_Low_Bridge_Close POI warning.
This tells you that you are 100m away from the Bridge and should reduce speed
You are now 100m from the Bridge at Point 3 – you then hear and see the Alert_Low_Bridge_Close POI warning.
This tells you that you are 100m away from the Bridge and should reduce speed
![]() This warning is used as a safety feature in case of fog,
bad road conditions, corners or temporary bridge height reductions (local
council put scaffolding up)
This warning is used as a safety feature in case of fog,
bad road conditions, corners or temporary bridge height reductions (local
council put scaffolding up)
![]() You drive under the bridge and continue on your planned
route
You drive under the bridge and continue on your planned
route
USER TIP: These examples show that just 3 POI files contain all
the information needed to avoid every
Step 2: Checklist of software and equipment needed
CHECKLIST
Before you can load the
POI Data Set onto the Garmin device you will need the following:
![]() A PC laptop or desktop
running Windows XP with spare USB port
A PC laptop or desktop
running Windows XP with spare USB port
![]() Garmin device (whichever
model you use) charged up
Garmin device (whichever
model you use) charged up
![]() The Garmin POI Loader
installed
The Garmin POI Loader
installed
![]() USB cable to connect the
Garmin device to the PC
USB cable to connect the
Garmin device to the PC
![]() The LANDIS MEDIA Ltd –
Fleet & Low Bridge DOWNLOAD
The LANDIS MEDIA Ltd –
Fleet & Low Bridge DOWNLOAD
![]() A note of your UNLOADED
cab height
A note of your UNLOADED
cab height
You have a set of POI on the DOWNLOAD,
these are divided into directories to make them easy to locate. Before you load
them onto the Garmin you will need to place the POIs you want to install into ONE single directory. That is you
need to move them from the DOWNLOAD directory into your “buffer” pre-install directory.
This is
because the Garmin POI loader does not load things incrementally (i.e. one at a
time) it loads all the POI
from one place at the same time, replacing
any previously loaded
POIs. So be careful that any
POI you use will be in this directory store or BUFFER and remain
there for as long as required.
We suggest you create on the
desktop an easy to locate directory called “Garmin_Store” and you place the growing number of POIs you will
install inside this folder. For this manual (an example) we will just be Low Bridges,
in real life there will in all likelihood be some other POI files there as
well, perhaps speed cameras, other transport data and so on. All the POI in
fact that you find useful
and need to load should be in that directory (wherever they
cam from DISK, DOWNLOAD, WEBSITES etc). By POI we in fact mean the .CSV and
.BMP files that together make up a POI “unit”.
Please be careful and don’t overload the
number of POIs – one user we spoke to tried to load over 400 POIs, this crashed
his Garmin. We suggest that you do not exceed the recommended POI number and
sizes described in the Garmin manual on the POI loader.
The POIs that you load
here will not in any way alter the
factory loaded POI that came with your
Garmin, its only the user loaded POI that are “cleaned” out each time and
have to be re-loaded. You need the
latest copy of Garmin SmartST Desktop software installed on your PC. Garmin SmartST
Desktop makes sure that you can load the POIs onto your Garmin device.
Even if you already
have Garmin SmartST Desktop installed, make sure that it’s the latest version.
Finally please ensure
you make a BACKUP – should anything
go wrong then you can always restore it. Landis Media Ltd cannot be responsible
if you make a mistake whilst installing POIs.
Step 3: Using Garmin POI LOADER and choosing
the Low Bridge
Connect your Garmin
device using the USB cable to your PC and then turn it on.
Make sure that the
LANDIS MEDIA Ltd - Fleet & Low Bridge DOWNLOAD has been SAVED (perhaps to
your DESKTOP) and then UNZIPPED. Whilst UNZIPPING you will EXTRACT the contents
“
It’s important that you
EXTRACT not just look inside the ZIP file you downloaded and also that you keep
the same folder structure of our DOWNLOAD.
Here you can see that
the DOWNLOAD was SAVED to DESKTOP and UNZIPPED (EXTRACTED with FOLDERS option
enabled) to the C: DRIVE. Here in the C: drive we can see the directory called
“

There’s also the MENU
webpage that will help locate the manuals etc. You can save the EXTRACTED
folder “
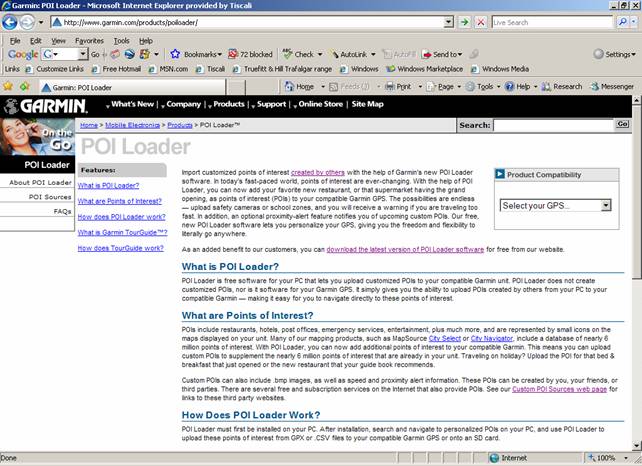
The Garmin POI Loader application
is available for free from the Garmin Website.
To get the latest version of this
software you will need to download it from the Garmin Website at: http://www.garmin.com/products/poiloader/
The screen is shown below, make
sure you select the correct licence terms and accept the conditions;
This box will appear
(below) – click save as and find a place to save the installer to – perhaps the
desktop for easy access ?
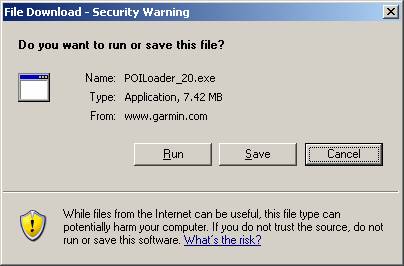
The download is about
8Mb in size and will take a while to download on a modem connection or a few
minutes on a broadband connection. Now make sure you save the downloaded file
to somewhere where you can locate it again. Perhaps the desktop for easy access
as we suggested above ?
Now simply follow the
onscreen instructions to install the application and in a few moments you will
have the Garmin POI Loader installed
and ready to use to install the
Step
4: INSTALL THE OTHER 2 LOW BRIDGE
As explained in Step 1: you have to install 3
![]() All
All
![]()
![]() The final file is one
of a total of 85 CAB HEIGHT POI
files – but which one ?
The final file is one
of a total of 85 CAB HEIGHT POI
files – but which one ?
The two files above;
Alert Low Bridge
POI - is
in the Low_Bridge_alert folder
these two POI files are easy
to locate (as they are always the same) and copy over (remember to copy the
.CSV and the .BMP file for one POI “set”)
Now for the CAB HEIGHT POI – this is a variable
file and depends on how high the vehicle you drive is. From the 85 individual
CAB HEIGHT files (in the 11 directories from 16ft to 6ft you need ONLY ONE FILE).
It’s simple – just
select the file that is the same height as your cab when unloaded. In our
example the CAB HEIGHT is 13ft 8inches and so you will copy over the
13ft_8inches_truck_cab_height file (.CSV and .BMP).
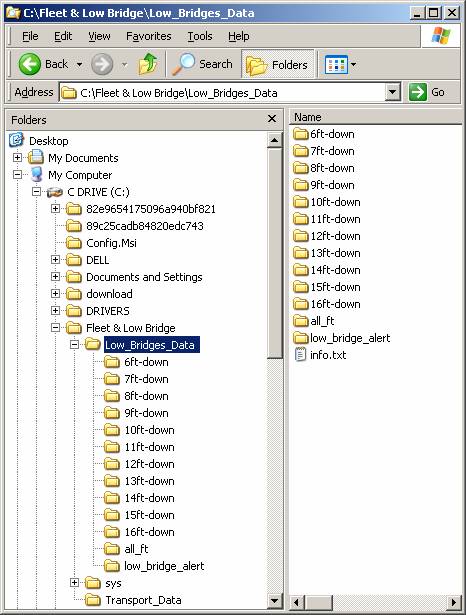
Above you can see there
are directories all the way from 16ft to 6ft and each one contains multiple
files. You need to locate a height that corresponds to your UNLOADED Cab Height. Included are the 85 separate height files
to cover every HGV, truck, caravan, lorry, motor-home and vans in the
SPECIAL NOTE: You only need your cab height from the list of 85
different heights. The Alert and All Low Bridge POIs contain every
HOW TO CHOOSE ?
If for instance you
drive a 13ft 8 inch cab – you would
look in the 13ft directory on the DOWNLOAD and select the 13ft-8_truck_cab_height.csv file. This file is the one that closely
corresponds to your cab height and so this is the final POI file to use. In
your case just pick the one that closely relates to your Cab Height. You will
also of course copy over the .BMP file as well.
So now you will have all
3 POI files (6 files 3 .BMP and 3 CSV) in your “Garmin_Store” on your desktop,
already to be installed onto the Garmin device. In the next stage we
will setup warning distances for these file its time to install these other two
files – once you have selected your Cab Height.
The warning distances that are recommended (setup whilst loading the
POI) for all the POI heights are as follows;
ALL
YOUR CAB HEIGHT e.g. 13ft 2inch WARN AT 1500m
You can see the files
below have now been COPIED into the folder “GARMIN-STORE” on the desktop, an
easy place to find them later on.
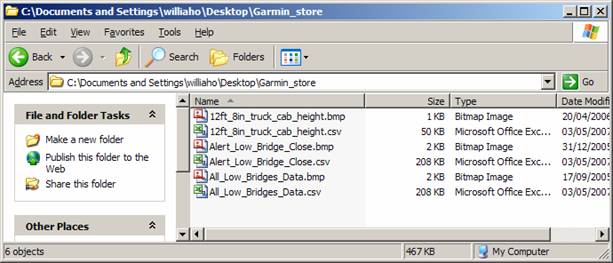
USER NOTE: The example above for
simplicity only shows the LOW BRIDGE POI files that are needed, as mentioned in
real life you would not just have the Low Bridge POI files here but all other
POIs you use, petrol stations, service etc.
As mentioned above in
the Step 1: you now have the three
Low Bridge POI files you need to setup the whole system and the warning distances
written down per file – you can proceed.
Step 5: CONNECT & INSTALL THE POIs
Now - connect the
Garmin device to the PC and off you go. The Garmin device will be powered by
the USB cable.
As soon as you plug
the USB cable in the Garmin device the GPS will turn itself on and the PC will
automatically launch the Garmin POI Loader application. If this does not launch
then check the cable and also try manually launching the application.
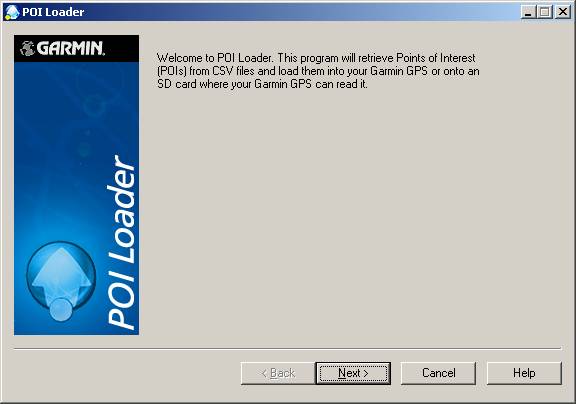
Click Next to move
to the main application screen.
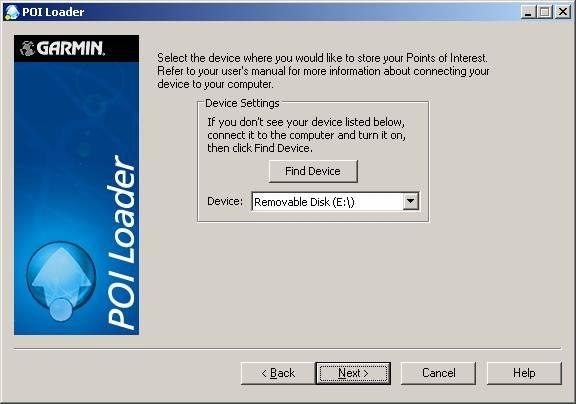
From the main
application screen click on the browse button and navigate to the folder with
the POI data on the PC
e.g. C:\Documents and
Settings\hwilliams\Desktop\Garmin_Store
USER SPECIAL NOTE:
This could of course be a common directory in which you keep updating POI as
they are added, to make sure you have them all.
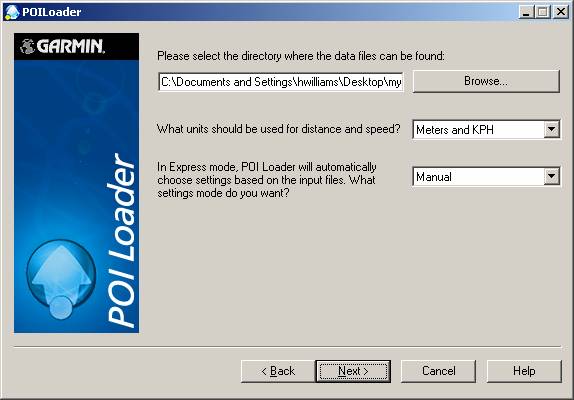
As in the example
above make sure that MANUAL rather
than EXPRESS/AUTOMATIC is selected,
this will ensure that we can control what happens until we understand the
process. Also make sure that the Browse points to the right place – in this
case "Garmin_Store" on DESKTOP
Once you have found
the correct folder for the data and you have selected setup MANUAL as an option
then press next.
The next screen is
one on which you can setup the proximity alerts related to speed and distance.
This is essential for
YOUR CAB HEIGHT e.g. 13ft 8inch WARN AT 1500m
ALL
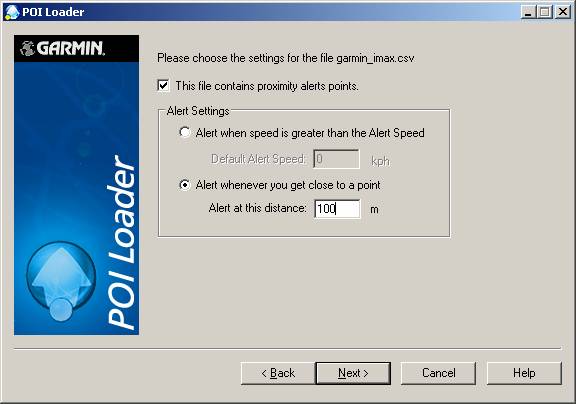
Above we can see
settings for speed and the methods that can be used, obviously you will alter
the 100m setting to the appropriate setting for that Low Bridge POI.
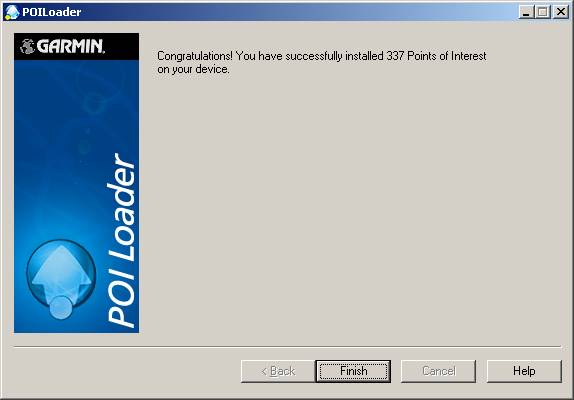
Click through this
screen when satisfied and then you will see the final screen – telling you that
you have successfully installed 3 POI’s. A number will be reported to you on
the number of points within the file. BE warned if you install lost of massive
files, stick to the listed recommendations.
It will take about
20-30 seconds to download the POI data , this time can vary depending on the
size and number of POI’s.
When that is
complete you can exit and either the Garmin device will reboot or you can exit
and reset it manually.
Step 6: TESTING & READY TO USE
Your Garmin is now
ready to use with the POI data that you just loaded, go into the menus and
locate the POI’s on the Garmin.
Typical locations
for the POIs to be shown on the devices are as follows;
|
StreetPilot i3: Where To > Food, Hotels & More > Custom Points |
StreetPilot c3x0: Where To > My Locations > Custom POIs |
|
StreetPilot 2xx0: Where To > My Locations > Custom POIs |
StreetPilot 2720 (new versions): Where To > My Locations > Extra's |
|
Nüvi 300: My Locations > Custom POI |
Nüvi Series: My Locations > Custom POI |
Test out the new POIs
by plotting a route or driving near to one of them and see they work. You may
also want to setup proximity warnings around some of these POIs.
Now you are ready
to load up all the POIs that you want
to use with the Garmin. Please consult
the Garmin help file supplied with the POI Loader for more details.
OTHER TRANSPORT DATA ON DOWNLOAD
To load up the Transport
Data that has also been supplied in the DOWNLOAD – you will need to locate this
data and copy it into the STORE then repeat the install process. We have
included petrol stations, congestion zones, ports, weighbridges, supermarkets,
M6 tolls, services, lay-bys and truck-stops. Lots for the HGV driver to use on
a journey.
With these TRANSPORT POI
you will be unlikely to want to allocate a WARNING DISTANCE for them. Other
than that the procedure is pretty similar and just follow the POI Loader
instructions and you can get them loaded.
As you do choose
additional data POI you will find the usefulness of the “Garmin_Store” folder
and how this BUFFER grows with the POI that you select. Otherwise you would be trying
to locate POI from many different places and that will not work with POI
loader.
FINAL NOTES & GETTING HELP
Please
use this data with extreme care in the same manner that you would be when
navigating with a paper based map. Should any information be inaccurate, please
send us details of this so we can correct it for the future. We recognise
that’s its very frustrating to be guided to a POI only to find its in the wrong
location. This is due to the massive task of data collection and compilation,
and there are unfortunately error rates.
To
do this we will require the POI name, location, co-ordinates, road and
direction. If you are unable to supply the co-ordinates then please let us know
the road and any crossing roads so we can locate it.
There are many sources
of help on the Internet that describe setup as well as the Garmin’s own
website. Please be cautious when installing very large or a large number of
POI.
As mentioned above
DO NOT OVER INSTALL the number of POIs and also always use the latest POI
software as this will ensure that you will not have problems.
Email us at helpdesk@garminfree.com
The team at GARMINFREE.COM