
HGVSOLUTIONS.COM – QUICK START GUIDE DOWNLOAD
Step 1: Checklist
of software and equipment needed
Step 2: Using tomtom HOME and choosing the KEYFUEL &
TRANSPORT POI Files
Step 3: Starting the tomtom and checking new files are
installed
Step 4: A FEW TIPS ON USING POIs
Step 1: Checklist of software and equipment needed
Please make sure that
you have the following;
![]() A PC laptop or desktop
running Windows XP
A PC laptop or desktop
running Windows XP
![]() TomTom device (whichever
model you use) charged up
TomTom device (whichever
model you use) charged up
![]() USB cable to connect the
tomtom device to the PC
USB cable to connect the
tomtom device to the PC
![]() The LANDIS MEDIA Ltd –
Keyfuels & Transport Data Download
The LANDIS MEDIA Ltd –
Keyfuels & Transport Data Download
You need the latest copy of TomTom HOME software
installed on your PC. TomTom HOME is tomtom’s update
program that runs on your PC and makes sure everything is up to date. It also
makes backups and installing and removing POIs easy.
Even if you already have
TomTom HOME installed, make sure that it’s at least Version 1.5 It can be downloaded from
here; http://www.tomtom.com/plus/service.php?ID=17
.
Download the TomTom HOME
software, save onto your desktop and then run the installer. If you have any
problems please contact TOMTOM directly who will help. If you use a version of
TomTom HOME that came on the disk you bought with the tomtom, still check that
you are using Version 1.5
When you first start
TomTom HOME and you haven’t used it before – you are likely to get a number of
update windows and requests. This is perfectly normal please see our
TROUBLESHOOTING section for details or the tomtom website.
Finally please ensure
you use TomTom HOME to make a BACKUP
– should anything go wrong then you can always restore.
Step 2: Using tomtom HOME and choosing the KEYFUEL & TRANSPORT POI Files
First you need to unzip
and extract the keyfuel download to the correct place on your PC. If you are
reading this you have probably already extracted it. Either way you need to
make sue the folder is located in the correct place, that’s the top level of
your C: drive
When this is in the
correct place it will look like this in file manager;
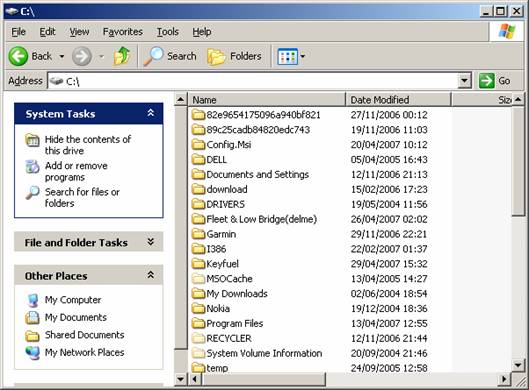
Here you can see that
the Keyfuel main folder is at the top level of the C: drive
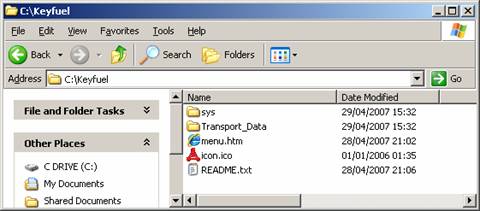
Inside this folder if
you have extracted it correctly should be the following file and folders;
You can of course
extract the folder to other places, but when installing the files later on
below you will need to substitute your location with the one shown. To make
things easy its best to copy exactly what is shown here.
Now connect your tomtom
device using the USB cable to your PC and then turn it on. Now start up TomTom
HOME – it may auto start or you may have to start it.
![]() Click the Explore icon
(highlighted in blue below) to connect your tomtom device to the software.
Click the Explore icon
(highlighted in blue below) to connect your tomtom device to the software.
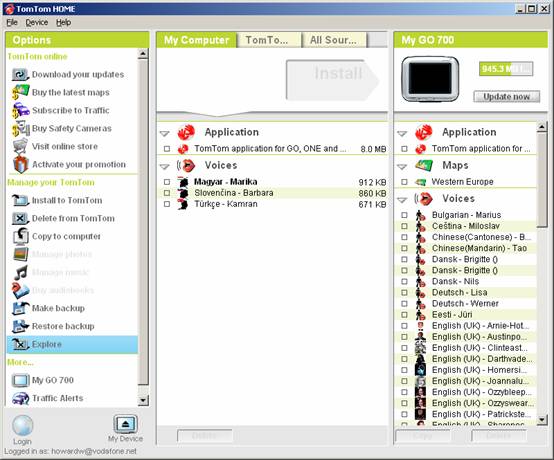
The example above shows
a tomtom 700 – your tomtom device type will also be shown in the top right
corner. The contents in the windows may also differ from this example above,
depending on what you have installed.
USER TIP: You may already have
some POIs showing in the right hand window (if you have installed any POI
before). If you need to remove or backup any of these older POIs then see our
TROUBLESHOOTING guide. The limit on the latest tomtom V6 software is 100 POI so
as long as you have less than this you are fine. The older tomtom V5 software
had a limit of between 29 and 40 depending on versions. A
good reason that you should use TomTom HOME and make sure you have the
latest tomtom software.
LOCATE THE KEYFUELS & TRANSPORT DATA POI FILES
To locate the Low Bridge
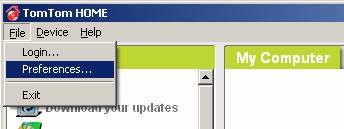
POI data files on the DOWNLOAD – click the File
menu and select Preferences
The Preferences Window will open up as shown below
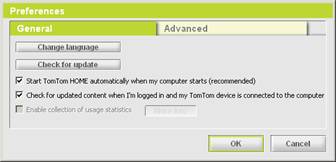
Please click on the Advanced TAB – (it turns green when
selected) and the windows content changes
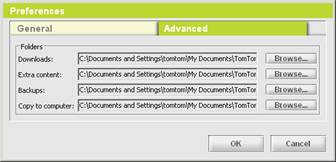
Now carefully click on the BROWSE button next to the line that
says Extra Content:
![]()
a Browse For Folder window will now open up
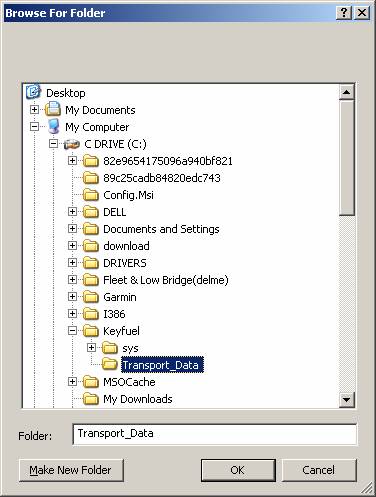
You will use this window
to locate the “Extra Content:” in this case it’s the Transport Data folder that
has all the POIs inside including the KEYFUELS.
Click inside this window
on My Computer (you can expand its contents using the + sign to its left)
Now click on C DRIVE –
inside should be a folder called Keyfuel
Expand this folder and
inside should be the Transport_Data folder (as shown
in blue above)
Click on this so that its highlighted and transferred into the box below
See a zoom of this below
![]()
Finally check all these details and
then click OK
NOTE: you first see the Browse For Folder screen the contents
of My Computer, C DRIVE and other folders may be “wrapped up” – to expand them
just use the + sign that’s next to the folder to see its contents. The window
above shows exactly how you should locate the right folder. Of course if you
extracted it to another location rather than the C: drive you will need to find
that location. We recommend the C: drive as its very
easy to locate.
If you selected the correct
folder a long list of Transport POIs will now appear in the middle window.
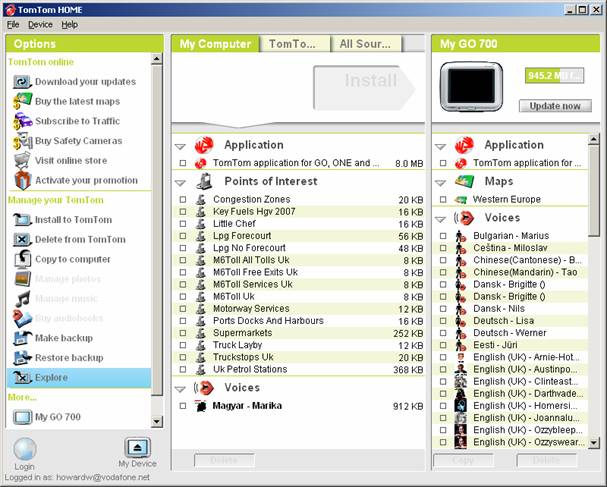
You can now install as
many of these POIs onto your tomtom as you like, as long as you don’t exceed
the device limits. The limit on the latest tomtom V6 software is 100 POI,
whereas the older tomtom’s using V5 software have a limit of between 29 and 40 depending on versions.
This is a good reason that you should use TomTom HOME and make sure your tomtom
device is running the latest software.
Try at first to install
the Keyfuels POI to get used to using the system. Locate it on the list in the
middle window, in the example above its second in the list. In your list it may
well be different depending on the number of POI you have loaded. Click the box
to its left and turn it grey (grey means that its
selected) like so;
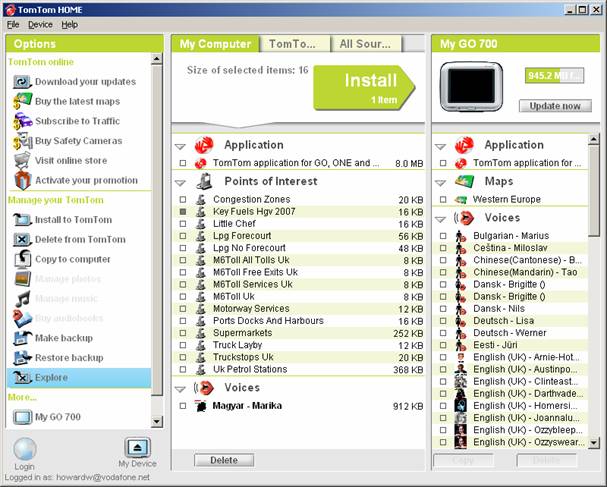
Once a POI has been
selected the Install arrow on top of the middle window turns Green (active) and
also displays the number of POI that are selected and ready to install (in this
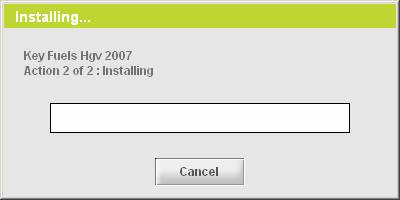
case your Keyfuels POI). Click the Install button, the window below will appear
on screen as the POI is uncompressed and installed.
Once completed you
should see the Keyfuels POI has been added to the list on the right hand window.
If you had POIs installed already you may have to scroll down the list.
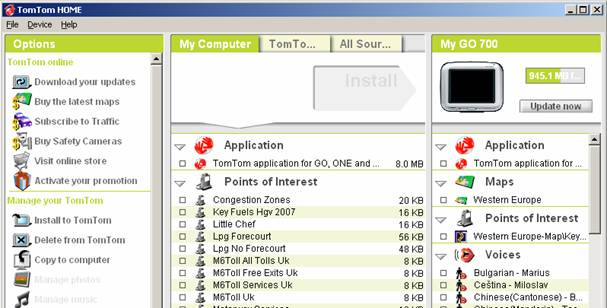
In our example its easy to recognise, its the only POI on the tomtom 700 at
the moment. After installing this
Keyfuels POI you can now repeat the process, select more of the Transport POI
from the list in the middle window and install them.
NOTE: You can return at any time to tomtom HOME, open up the download
contents and add new POI from this list, you can add
POI as you decide to. Indeed Landis Media Ltd supply a range of other POIs for
you to use, and can also create custom POIs for your company or business.
Perhaps you might like to have all of your depots as a POI set
?
When you have installed
the POIs you require at the moment please Turn OFF your tomtom device and
unplug the USB cable.
Step 3: Starting the tomtom and checking new files are installed
NOTE: In this section are
actual SCREENSHOTS from the tomtom device and these show
Version 6 of the tomtom software. Where necessary the entire screen is
illustrated, however in other places just use the ICON needed is shown.
Turn on the tomtom
device – it may take a little while to start (a blue and yellow line and the
words wait may also appear). This is perfectly normal the tomtom is loading up
the new software and POI you have added, just be patient, it can take up to 2
minutes if you have updated the tomtom firmware version.
CHECKING
POIs HAVE BEEN INSTALLED CORRECTLY
From the tomtom front/start screen
– click to get the Main Menu 1 of 3 Screen
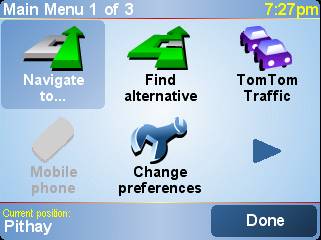
Select Change Preferences option and go to the Preferences 1 of 7 screen
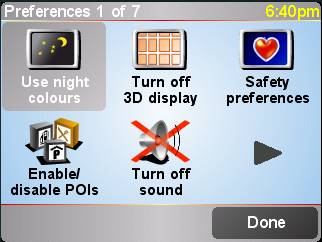
Select the Enable/ disable POIs option and click DONE
The next screen POI category shows a list of the
installed POIs (including the ones that came with the tomtom). Check for the
Keyfuels POI as well as the others you installed, and make sure you tick any
you want to use.
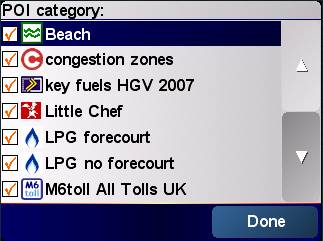
They may appear anywhere
on the list as its sorted alphabetically. In this
example the Key fuels HGV 2007 can be seen and it has been enabled (ticked).
Click to tick next to any of the POIs you want to use.
EXPERT DRIVERS TIP: When planning routes on
maps using POIs the tomtom can sometimes slow down and the screen gets very
crowded. Sometimes the POIs won’t display correctly as the tomtom tries to show
hundreds of little icons. If this happens its
suggested that you just turn off all the POI not used for the planning. Then
plan the route and turn the POIs back on, typically truck drivers do this when
planning with Low Bridges.
When ready click DONE – you have now complete the
installation of the POIs.
Step 4: A FEW TIPS ON USING POIs
You have now completed installing
the POIs but there are useful techniques for helping you get the most out of
them, and some are shown here.
SETUP
PROXIMITY ALERTS
You might want to know
when you are near to a POI so that you can make a
small detour to it (or around it). A proximity alert allows you to do this and
get a visual warning as well as a sound when you are close to a POI.
To setup a simple
proximity warning from the start screen – click into Main Menu 1 of 3 then into Preferences 1 of 7 screen. Now use the
right arrow ![]() to move through the Preferences screens to Preferences
2 of 7 screen.
to move through the Preferences screens to Preferences
2 of 7 screen.
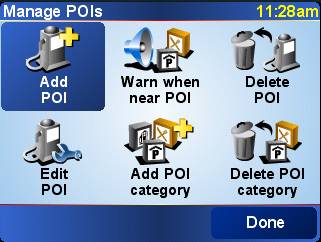
 Now click on Manage POIs which will take you to the Manage POIs screen
Click now on 'Warn
when near POI' ![]() you
will be prompted to choose the POI category you want the warning for. In this
example use Congestion Zones, its useful to be warned
about these so you can avoid them.
you
will be prompted to choose the POI category you want the warning for. In this
example use Congestion Zones, its useful to be warned
about these so you can avoid them.
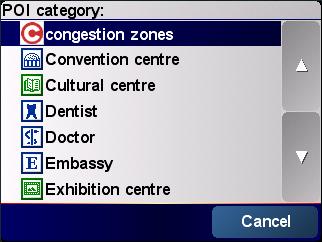
You select the category
(its highlighted in blue) and this takes you to the
next screen. The Warn when closer than:
screen opens up, you setup the warning distances here. That is the distance
from the POI when the alert should sound and the screen flash. In the case of
the Congestion Zones the default 250m is adequate, but you can change this
setting if you want. When completed click DONE.
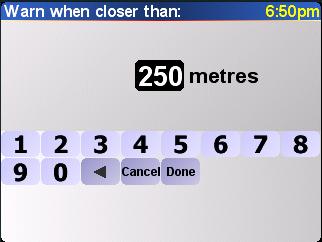
USER TIP: As you get used to this
system you can “tune” these warning distances for your own personal preference.
For now just use the values suggested until you get the hang of things.
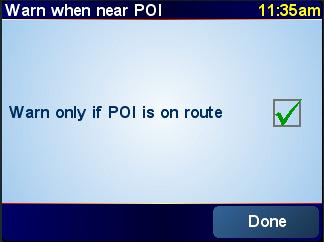
Finally the “Warn only if POI is on route” box is
appears. Deciding whether to tick it depends on the POI type. For cash machines
and other useful places you will probably want to know whenever you are within
250m of them. For congestion zones it’s the opposite, you only need to know
about the ones on your route as you ant to avoid them.
Finally you select a warning noise
to alert when the POI is within the distance chosen earlier. On the Low Bridges
special warnings were developed to replace this option. Here however just
select a noise that is likely to be noticed by you from the list of sounds
tomtom supply.

That’s it all done – the
warning is setup for that POI.
You can now repeat the
above steps and setup warnings using the 'Warn when near POI' ![]() option
for as many POI as you like.
option
for as many POI as you like.
SETUP
PROXIMITY ALERTS
You will now learn how
to find POIs when you are travelling, locate and be able
to drive to them. This is the most common thing that drivers need to do, locate
a POI, check where it is and then drive to it.
![]()
To the feature select the route
planning option from the Main Menu 1 of
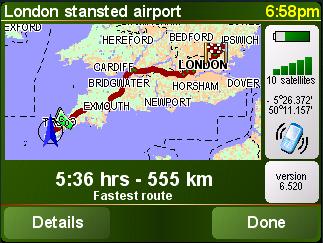
3 Screen and click on the 'Navigate to' icon. Choose a route as per normal – but pause when
you reach the route summary screen (shown below). Instead of clicking “Done” as you would normally, click “Details” instead.
 On the
USER NOTE: You can see what was
meant by the screen being crowded with POI. The tip earlier where ones not
ending used are turned off is a good idea.
On the screen click “Find” then on the next screen select Point Of Interest
as the category of what you want to find

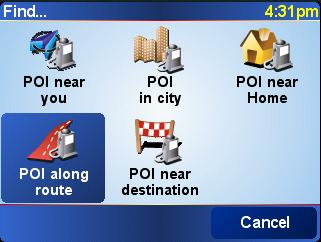
The next screen is “Find…” you select “POI along route”
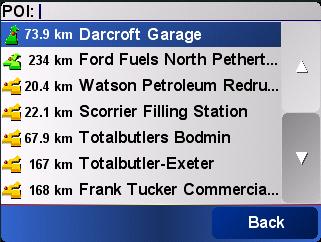
A list of POI categories
will appear. If at first you see only a few large ones, use the right arrow ![]() to see the full list, just like the picture
below. Scroll through the list and select the POI you want to see on your
planned route in this case key fuels HGV 2007
to see the full list, just like the picture
below. Scroll through the list and select the POI you want to see on your
planned route in this case key fuels HGV 2007

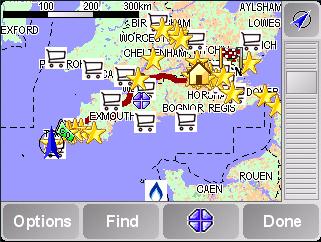
The next screen shows
the POI on your route, in this case the Keyfuel garages I cans top at toi refill in my HGV.
A quick not about the
icons next to the names. They mean different things and these are as follows;
![]() = The POI is on your route and you will drive
right past it
= The POI is on your route and you will drive
right past it
![]() = The POI is near to your route, a short
diversion will take you to it.
= The POI is near to your route, a short
diversion will take you to it.
![]() = The POI is off your route, but still near
enough that a short drive will get you to it.
= The POI is off your route, but still near
enough that a short drive will get you to it.
This is very useful to
know so you can identify Keyfuel stations for example that you can refill at
without driving all over the country.
If you click on one of
the names in the list above you will be taken to an overview of the map. Here
the DArcroft garage is shown as this was the chosen
garage in the example.
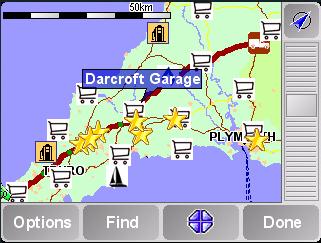
You can use the “zoom”
bar slider on the right to “zoom” into the chosen POI as needed. Here you can
see that the Keyfuels garage is next to the A30.
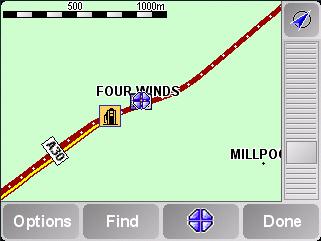
Use the pointer to point
at any item on the maps and get information about it. You can also once you
have selected a POI you like, get a route to take you there. See the
TROUBLESHOOTING guide for more info.
USER TIP: When planning a complex
route its sometimes easier to turn off all the POI you
won’t be using for planning. This can make seeing the
Troubleshooting
There is an extensive
troubleshooting guide on the DOWNLOAD. It covers more complex queries such as;
![]() My TomTom HOME looks different to your how do I know what
version I am using ?
My TomTom HOME looks different to your how do I know what
version I am using ?
![]() I Loaded up TomTom HOME but I get lots of strange messages
about updates and things like that and cant get past them ?
I Loaded up TomTom HOME but I get lots of strange messages
about updates and things like that and cant get past them ?
![]() My TomTom has frozen while trying to connect it to TomTom
HOME what can I do ?
My TomTom has frozen while trying to connect it to TomTom
HOME what can I do ?
![]() What version of the TomTom software am I using / my TomTom
looks different to the screenshots in the manual why is this
?
What version of the TomTom software am I using / my TomTom
looks different to the screenshots in the manual why is this
?
![]() I am a contract driver and drive many different height
vehicles what do I do ?
I am a contract driver and drive many different height
vehicles what do I do ?
![]() Why cant I get special voice warnings for the Other
Transport POIs ?
Why cant I get special voice warnings for the Other
Transport POIs ?
![]() Where can I get some more POI from you ?
Where can I get some more POI from you ?
![]() How can I plan alternative routes with the TomTom to avoid
bridges rather than using the roadblock ?
How can I plan alternative routes with the TomTom to avoid
bridges rather than using the roadblock ?
![]() Where do I get my
Where do I get my
![]() I use TomTom Navigator – I can’t use TomTom HOME with this
what do I do ?
I use TomTom Navigator – I can’t use TomTom HOME with this
what do I do ?
![]() What do I do when I need to update my Low Bridge POIs ?
What do I do when I need to update my Low Bridge POIs ?
![]() How do I uninstall old POIs from my tomtom using TomTom HOME ?
How do I uninstall old POIs from my tomtom using TomTom HOME ?
![]() How can I backup or save POIs from my tomtom using TomTom HOME ?
How can I backup or save POIs from my tomtom using TomTom HOME ?
![]() I like my distances in metres/yards – how do I swap this over ?
I like my distances in metres/yards – how do I swap this over ?
![]() I am used to the “old” method of installing POIs using
.OV2 and .BMP files what should I do ?
I am used to the “old” method of installing POIs using
.OV2 and .BMP files what should I do ?
If you have a more complex
query or are getting stuck at a particular point we would suggest that you try
this section first for help. You can always contact us at helpdesk@hgvsolutions.com