
Setup Using HOME 2 (Versions 2.x)
If you have it already installed on your PC then you can check the version. Start up TomTom HOME, then at the very top of the window click on Help and then About TomTom HOME. This open a version information window, if you are using 2.x then this is the right guide.
However if you are using version 1.x then please see the alternative guide which you can find from the nav-bar. If your device will work with V 2.x then 1.x should prompt you to download it automatically. Currently it is supported by: GO 520 /720, GO 910/710/510, GO 700/500, ONE 3rd Edition, ONE 2nd Edition, ONE 1st Edition, ONE XL. If you need to manually download it then select the link to Download HOME 2 from the nav-bar.
If your device does not support HOME at all (Navigator version before 6 on PDA's) Please email us and we will be able to send you an alternative to install.
Step 1: Preparation & Checklist
These instructions will work for all recent TomTom devices including TomTom GO: 3 series, 5 series, 7 series, 9 series. TomTom Rider, Mobile, One, One XL, Navigator and PDA (version 6 and above).
Checklist of software and equipment needed:
- A PC running windows (ideally XP or Vista)
- TomTom device (fully charged or running from mains adapter)
- USB cable for connecting a TomTom to the PC
- The HGV Fleet & Low Bridge DOWNLOAD or CD ROM
Also required is an up to date version of TomTom HOME installed on the PC. These instruction are for HOME Version 2.x. This can be downloaded from DOWNLOAD HOME or use the link on the nav-bar.
TomTom HOME is a software program that runs on the PC and enables the user to carry out important activities. This includes installing "Places Of Interest" (POI) onto the TomTom. To check which version of HOME you have, start up TomTom HOME and at the very top of the window click on Help and then About TomTom HOME. This opens a version information window, Version 2.1 or higher is required. If you have HOME V 1.x then please see the other manual.
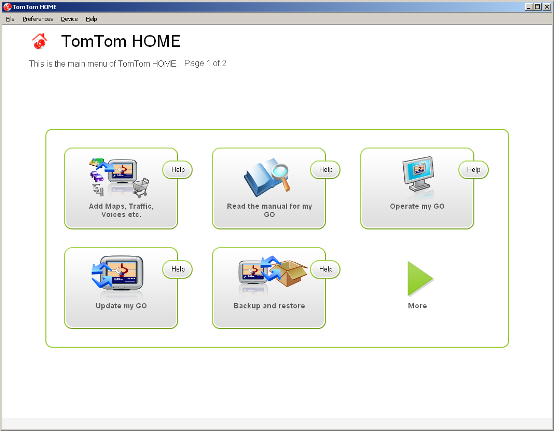
With TomTom HOME installed on the PC, connect the TomTom to the PC with the USB cable and then turn on the TomTom. TomTom HOME will detect that a TomTom has been plugged in and start automatically. If it doesn't start then it must be started manually. In windows click Start - All Programs - TomTom - then click TomTom HOME to open the program.
Initially make a full backup of the TomTom using the Backup & Restore option from the "Main Menu Page 1 of 2". Any problems encountered later on can be solved by restoring the TomTom.
If the TomTom hasn't been connected to TomTom HOME before then its likely that your device will require updating. Before proceeding we suggest that you click on "Update My GO" and make sure that you have the latest device software. Updating the TomTom software is recommended so you can take advantage of the new features and keep the device current.
With TomTom HOME installed, the TomTom device software up to date and a full backup taken, you can begin installing the "Places Of Interest" (POIs). These are a number of files with information on the Low Bridge locations, which when added to your TomTom will enable you to locate and avoid Low Bridges.
Step 2: Quick Overview
There are 9 easy steps to setting up HGVSOLUTIONS – Fleet and Low Bridge Data Disk or Download with your TomTom. You are already on Step 2 which introduces you to using Low Bridge POI data and an overview of how the system operates to warn you about bridges. Make sure you read this step carefully because the background given will help you decide which POI files you will require later. Below are two EXAMPLES given to demonstrate how in practice Low Bridge POI warnings work.
Example 1: Driving a 15ft 4inch cab and the vehicle cannot fit under the 14ft 7inch Railway Bridge that’s on the planned route ahead.
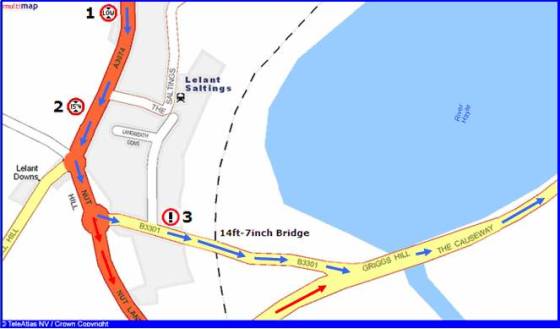
Please follow the steps to see what happens on the picture above:
-
The driver is following the route that the TomTom has planned (shown by the BLUE arrows)
-
He is 2km from the Bridge at Point 1 and hears and sees the POI alert for the “All_Low_Bridges_Data” POI
-
This warning tells him that a bridge is ahead on the route, and he will need to listen out for further warnings over the next 2 KM. He continues to drive.
-
He is 1.5km from the Railway Bridge at Point 2 when he hears and sees the 15ft 4inch Low Bridge POI warning (for his cab height).
-
This indicates to him that he won’t fit under the bridge ahead and he will need to find another route.
-
He chooses an alternative route using the TomTom (shown by the RED arrows) and diverts off the old route at Nut Hill roundabout.
-
He goes down Nut Lane and avoids the Low Bridge on the B3301 by the Railway Tunnel.
-
He rejoins the planned main route (BLUE arrows) at Griggs Hill and continues as planned.
Example 2: Our driver is now in a truck with a 13ft 2inch cab height. He will easily fit under the 14ft 7inch Low Bridge that’s on the planned route.
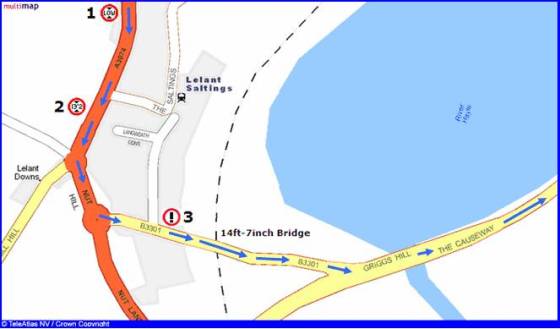
Please follow the steps to see what happens on the picture above:
- The driver is following the route that the TomTom has planned (shown by the BLUE arrows)
- He is 2km from the Bridge at Point 1 and hears and sees the POI alert for the “All_Low_Bridges_Data” POI
- This warning tells him that a bridge is ahead on the route, and he will need to listen out for further warnings over the next 2 KM
- He continues to drive on the route
- He is now 1.5km from the Bridge at Point 2 – this time he doesn’t see or hear any warning – why not ? Well his cab height is 13ft 2inches and will fit easily under the 14ft 7inch railway bridge
- Since he hasn’t heard a warning he keeps driving safe in the knowledge that the bridge won’t cause any problems
- He is now 100m from the Railway Bridge at Point 3 – when he hears and sees the “Alert_Low_Bridge_Close” POI warning. This tells him that he is very close (within 100m) of a bridge and he needs to reduce speed
- This warning is only used as a safety feature in case of fog, bad road conditions, corners or temporary bridge height reductions (local council put scaffolding up)
- He drives under the bridge and then continues on the planned route
Step 3: Configuring TomTom HOME
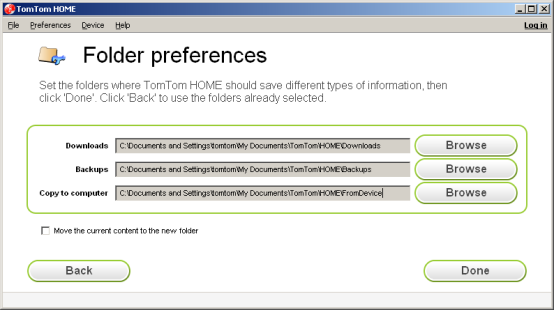
Connect the TomTom to the PC, start TomTom HOME and then click on the "Preferences " menu at the top of the window and then select "Folder Preferences".
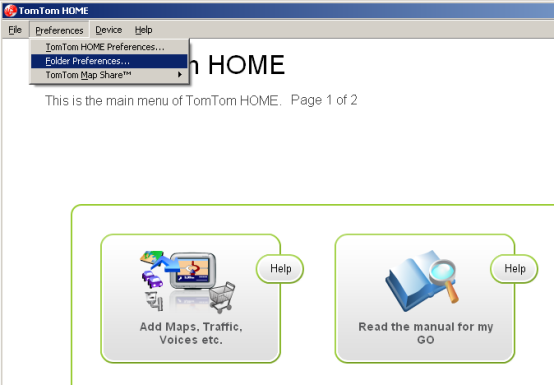
Now you will see three folder preferences, the one we will alter is the "Copy to computer". Before changing this you need to write down the "path" (the text to the right of it) because later on you will need to re-enter this as it is now. The example below will be different from your entry, so please make sure you record yours safely and carefully.
In case you don't note this down it will be the following for Windows XP:
C:\Documents and Settings\XXXXXXXX\My Documents\TomTom\HOME\FromDevice
Where the XXXXXXXX is your user name when you log in. So if you log in as JosephBloggs then it would be:
C:\Documents and Settings\JosephBloggs\My Documents\TomTom\HOME\FromDevice
Now with the information noted down safely, change this setting so that HOME will "look" for POIs on the DOWNLOAD or CD ROM. Click the "Browse" button directly to the right of the "Copy to computer:" line and a "Browse For Folder" window will open
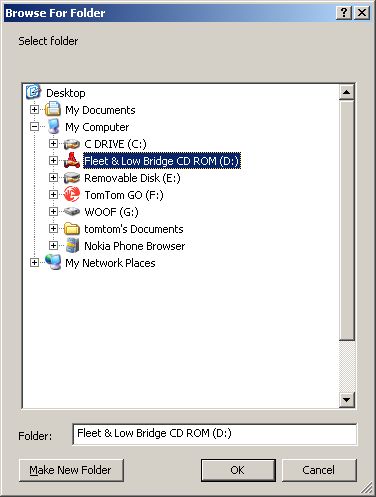
If you are installing from the CD ROM then select the CD ROM from the browse window as shown. Click on the Fleet & Low Bridge CD ROM and its name will appear in the Folder: line (check that it does) as above. Then click OK. Make sure that if you have two or more CD ROM drives that you select the correct one.
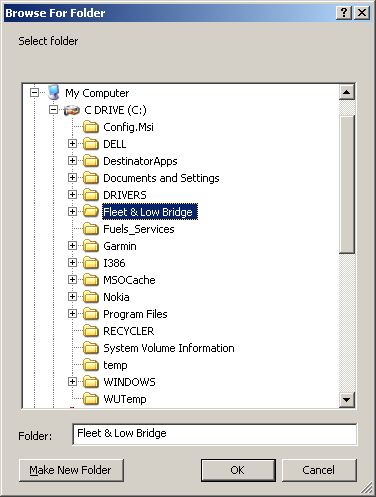
If you are using the DOWNLOAD then you need to locate the directory that was created by the DOWNLOAD. This will be on your C: drive at the top level unless you have moved it, it is also the same place that you opened the MENU from to read these instructions. Click on the directory name and it will appear in the Folder: line (check that it does) as shown above. Then click OK.
If you have trouble finding these locations you can use the + sign next to an item to expand its contents and the - to shrink it. If My Computer is not already expanded (like the example above) just lick on the + sign to its left. This will display all the devices on the PC; hard drives, folders, DVD's, CD ROM's etc.
You will return to the Folder Preferences Window with the file path having now changed beside Copy to computer: reflecting the adjustment you made. Below we show the example for the DOWNLOAD but if you are using the CD ROM then this would also be reflected here (with a drive letter e.g. D:\ )
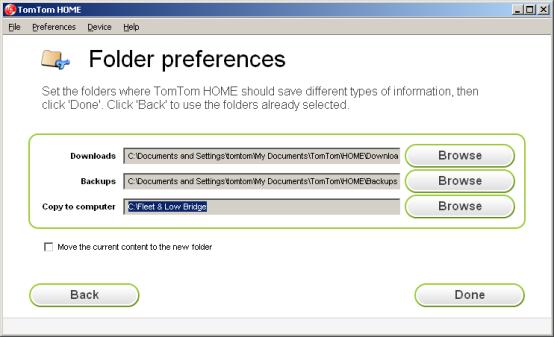
click the DONE button to return back to the main TomTom HOME window.
Step 4: Installing Low Bridge POIs
 Page
2 of 2 in the Main Menu.
We suggest that if you have installed the same POI that are now
being updated, that you do delete the old ones first. This will
ensure that you don't get muddled when installing the new ones.
Page
2 of 2 in the Main Menu.
We suggest that if you have installed the same POI that are now
being updated, that you do delete the old ones first. This will
ensure that you don't get muddled when installing the new ones.
All POI from the HGV Fleet & Low Bridges Solutions DOWNLOAD or CD ROM are labelled Version 1.1 and you can check this as explained below. This will ensure that as new versions are released then you can check which is the new one.
However having a "clean" TomTom on which to install them on is a good idea anyway. Since you will have taken a backup, you can restore anything you need if there's a problem. However make sure that you only delete the POIs you will be replacing and not other POI from different suppliers e.g. speed cameras.
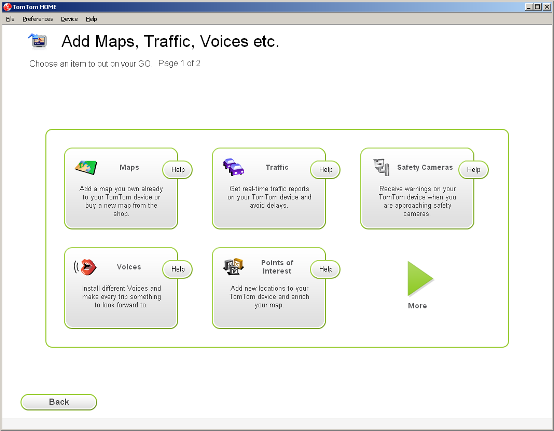
Now that the setting has been changed to "point" to the data locations, the POI will be visible. To see them click on the "Add maps traffic voices etc" button as shown below.
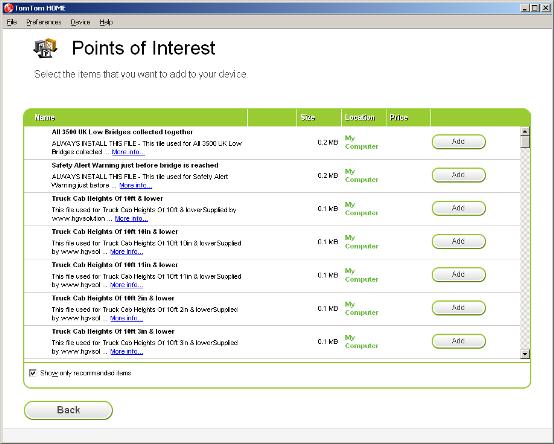
Now click on the "Points of Interest" button to see the list of points of interest.
You will see a long list of POI's as you can see below a sample. All of our POIs have HGVSOLUTIONS listed as the supplier as well as help details and a copyright notice. If there are any information or tips relevant to a POI then they will be included in the details. To see details just click on "More Info" link for a POI.
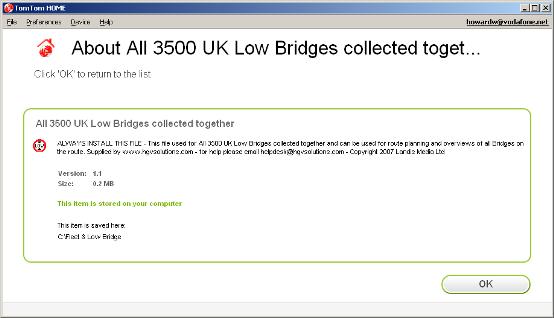
The More Info link will show you additional details for that POI, a logo and its version, size and location. This is useful when removing and adding POIs to make sure that you have the latest version of them. This is also where any information specific to that POI is stored. An example of this screen is shown below:
As explained in Step 1: you will only have to install 3 Low Bridge POI files in total. The first two POI files are always the same whatever the vehicle and so these are installed first of all as they are very easy to do. The two you need are shown below
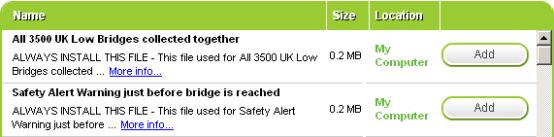
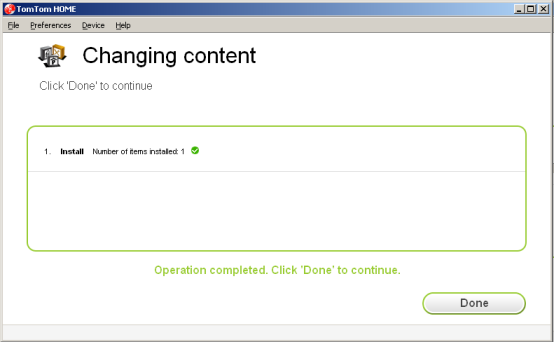
To install the POI all you do is click on the button next to it that says "Add" and it will then start installing. Once you have completed installing each POI you will get a confirmation window like that below. After installing the first POI you will be taken back to the main menu and will need to click back in to install the second POI.
The final part of the setup is to install the final POI that corresponds to your cab height. With a fixed vehicle of certain height you will only need to install a single POI file as described above. This cab height file is used to alert you to bridges of height that you cannot drive under and therefore need to avoid.
The cab height POIs are all heights, shown as " Truck Cab height of 14ft 3in and lower" and so on. There are 85 file sin all ranging from 6 feet to 17 feet, and so there is a file for every cab height of UK commercial vehicles. You need to select the height that corresponds to your UNLOADED Cab Height. However if you drive multiple vehicles then we suggest you read the box below.
However if you are a contract driver or drive multiple vehicles then you may drive with more than one cab height and so need more than one height warning file. We recommend in this case that you install a "range" from the lowest to highest heights you drive. So a driver of large vehicles may drive from 13ft 2in to 14ft 9in vehicles, in which case he might decide to install the files from 13ft all the way up to 15ft inclusive (about 20 files).
These will not give you "more" information they will just allow you to avoid bridges based on a range of cab heights. You will only ever be using 3 POI files at any one time (the All , Safety and cab height) but the other cab heights will be available on the tomtom. So each time the vehicle changes you can select the new cab height from POI already installed.
Some people feel that if they are not installing all 85 files they are in some way "missing" some data - this is NOT THE CASE. Installing more files than required just wastes space and duplicates the same data.
So you will now have selected the correct cab height file (or files see the box above) and to install them you just click on "Add" again. As before if you are adding multiple POI you will need to click back into the menu each time.
 Once
you have added all of the POI we recommend you should now have at least
3 POI installed as a minimum (All Bridges, Safety Warnings & your cab
height) and possibly if you drive multiple vehicles a number of POI (All
Bridges, Safety Warnings & a number of cab height files).
Once
you have added all of the POI we recommend you should now have at least
3 POI installed as a minimum (All Bridges, Safety Warnings & your cab
height) and possibly if you drive multiple vehicles a number of POI (All
Bridges, Safety Warnings & a number of cab height files).
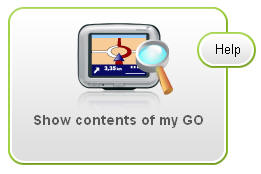
You can check on what has actually been installed and make sure they are all on the TomTom by clicking back to the "Main Menu Page 2 of 2" and then pressing the "Show contents of my GO" button (displayed to the right hand side). This will take you into a window called "Show contents" on which you can see what's on your GO.
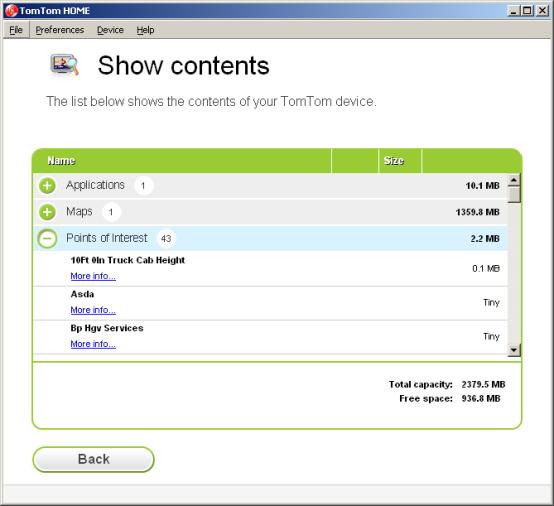
The POI from HGVSOLUTIONS that we supply have been specially created so that they will not "vanish" once they have been installed. If you have installed POI from 3rd parties or backups you will probably know that they "disappear" once the have been installed. We made the choice not to do this so that you could always see and install our POI as many times as you want to, so don't worry if they are still listed as well as being installed.
Step 5: Other Transport POI
On the DOWNLOAD or CD ROM are other useful POI, which you may have seen as scrolling through the list. All you do is Add these in just the same way as you did for the Low Bridges. Just select the ones you need and add them, that's all there is to installing them.
Once you have installed all of the POI that are required you need to "reset" the Folder Preferences changed in Step 3. This was the "path" that you wrote down safely, which now needs to be replaced. Simply click again on the Browse button and locate the right folder. Make sure that it reflects exactly what it did before. Below is an example of our Folder Preferences, yours however will have a different username.
Once
Once this has been restored the Fleet & Low Bridge POI list will not appear next time you log in to tomtom HOME. If you need to re-install the files or at later stage add some, then you should go through changing the setting again from Step 3 so that HOME picks up the POI from the right place (DOWNLOAD or CD ROM).
After all of this has been done you can now close down TomTom HOME, turn OFF your tomtom device and unplug the USB cable.
Step 6: Checking the POIs are installed
To check the POI categories have been installed properly turn on the TomTom and wait for the start-up screen. If you made a number of updates or installed lots of POI categories then it may take slightly longer than normal for the TomTom to start.
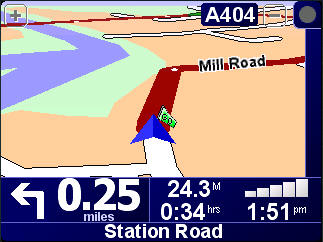
 the standard
"driving" screen will shortly appear similar to the example above. Click the middle of the screen to
open the menu and select the Change preferences icon shown to the right.
the standard
"driving" screen will shortly appear similar to the example above. Click the middle of the screen to
open the menu and select the Change preferences icon shown to the right.
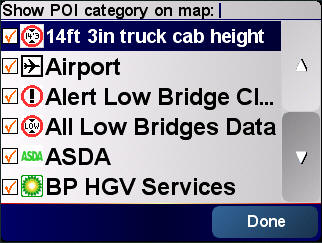
Now click the Enable/disable POIs (below) or the Show POI on map (underneath) - this will depend on your software version

A screen like the one below will now appear with a list of POI categories, ticks will be shown beside all POIs that are activated. You need to make sure that there is a tick against all the POIs you just installed to make sure they are active.
Step 7: Setup Warnings & Alerts
You now need to setup the warnings/alerts for these POIs so that you will be alerted when near to a bridge. On any TomTom running V 6 software and above (make sure you update using tomtom HOME to this version) you can have spoken voice alerts that we have created even if you don't have the new text to speech features of the latest tomtom's.
The alert will also flash up a height icon showing that the bridge is lower than the height displayed. These alerts are used to help you make decisions whilst driving and route around bridges, we explain some techniques later.
There will be three warnings to setup and these are for;
"Low Bridge Close" Safety Warning - WARNING AT 100m
"All Low Bridges" UK wide - WARNING AT 2000m
"Truck Cab Height" e.g. 14ft 3inch - WARNING AT 1500m
The warning distances above are suggested and you can adjust these to suit your
needs. As a rule though the All Low Bridges should always come before the cab
height warning and the Safety Warning should always be last and a very small
distance from the bridge.
If you installed several cab height files (contract drivers) then you will need to setup warnings for each of them. When they are deactivated (see above) the warning will be saved until that POI is re-activated.
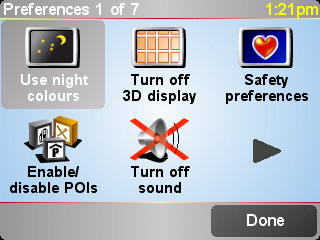
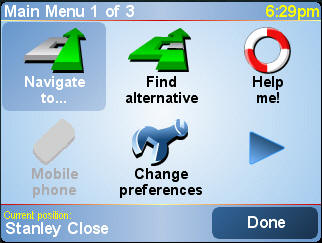
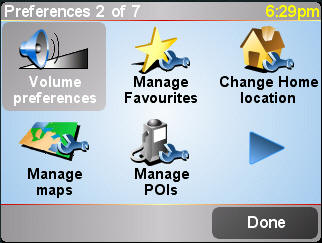
From the "driving" screen click as before into "Main Menu 1 of 3" and then on "Change preferences" into "Preferences 1 of 7" screen
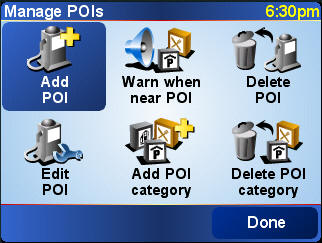
Now use the right arrow to move through the Preferences screens to "Preferences 2 of 7" screen. Click on "Manage POIs" to enter the POI management menu.
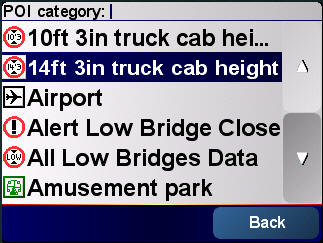
Click on 'Warn when near POI' and you will be prompted to choose the POI category to warn for.
In this example we choose the Cab Height POI ( 14ft 3in in our example below).
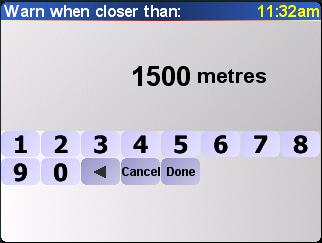
Once selected the "Warn when closer than:" screen option opens up. The warning distance of the vehicle from the POI (in this case Low Bridge) are set here. In the case of the Cab Height POI this distance will be 1500 metres, adjust the figures to match that below and then click DONE. You have now set a warning that is triggered when the vehicle is 1500m from a Low Bridge.
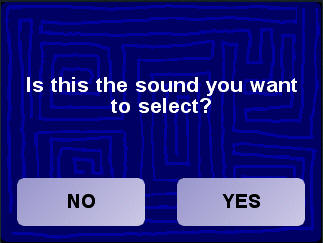
Normally you would select a sound at this point but because we have added the "spoken alerts" the TomTom assumes you will use them, just answer YES. If your tomtom doesn't support these alerts (Versions less than 6.0) then you will see the "standard" sound selection (bells, whistles, klaxons etc). All TomTom's can use these spoken alerts, just make sure that it has V 6 or later installed.
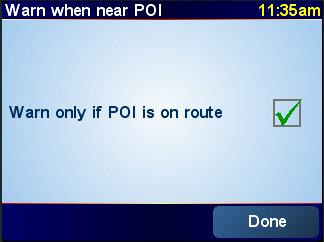
Finally make sure the “Warn only if POI is on route” box is ticked. This is used to try and remove spurious warnings e.g. when travelling over a low bridge on a flyover. If however you find that you are not receiving bridge alerts in places you expect them then try turning this off.
Repeat this process for each of the POIs you need to, setting the relevant distance each time.
Step 8: Using the tomtom to find the Low Bridges on your routes
What all drivers want to do is locate all of the Low Bridges on their planned
route, showing the heights and locations so they can plan how to avoid them. In
feedback drivers agree that the single most useful feature is being given a
list of bridges on the route, with heights and being able to zoom in on
their location. Whether they use a map or the tomtom to work out a
new route this is the “must have” feature.
![]() To
use this feature select the route planning option from the "Main Menu 1
of 3" Screen and click on the 'Navigate to' icon. Choose a route
as per normal – but pause when you reach the route summary screen (shown
below). Instead of clicking “Done” as you would normally, click
“Details” instead.
To
use this feature select the route planning option from the "Main Menu 1
of 3" Screen and click on the 'Navigate to' icon. Choose a route
as per normal – but pause when you reach the route summary screen (shown
below). Instead of clicking “Done” as you would normally, click
“Details” instead.
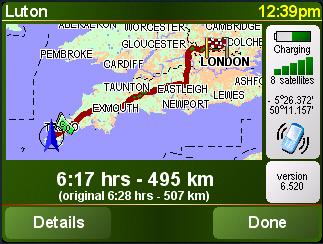
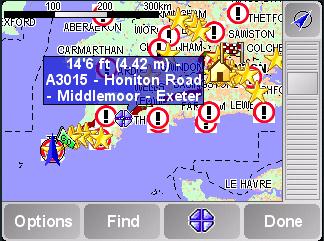
 On
the next View Route screen select the “Browse Map Of Route” icon. This
will display an overview (or the last level zoomed) of the route
as shown below.
On
the next View Route screen select the “Browse Map Of Route” icon. This
will display an overview (or the last level zoomed) of the route
as shown below.
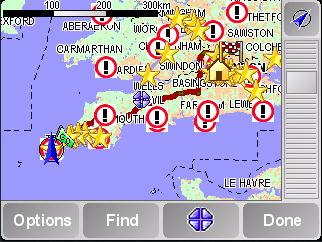
On the screen above click “Find” then on the next screen select the
"Point Of Interest" you want to find

This will take you to the following screen “Find…” where you select “POI along route”

A list of categories will now appear. If at first you only see a very limited selection then you will need to use the right arrow to see the full list. Scroll through the list and select the Low Bridge POIs you want to see on your route.
There are two main choices which are:
 Select this to see every single Low Bridge on
your route, this will include all bridges i.e. ones you can fit
underneath and also ones that you cannot
Select this to see every single Low Bridge on
your route, this will include all bridges i.e. ones you can fit
underneath and also ones that you cannot
 For a more selective list you can
click on the Cab Height POI and this will show you all of the bridges
that are going to be a problem and are less than 14ft 3in (in our
example)
For a more selective list you can
click on the Cab Height POI and this will show you all of the bridges
that are going to be a problem and are less than 14ft 3in (in our
example)
Whichever Low Bridge POI you choose the next screen is a route summary with all the Low Bridges and their heights (in metres and feet) shown in a nice list format
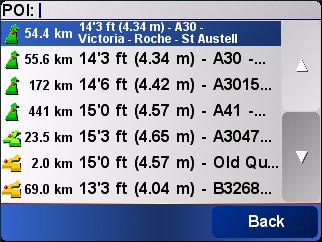
Drivers find this screen extremely useful because the heights of every bridge on and near to the route is shown. They can use this to plan the way around bridges and know which bridges are on close by roads. If they click one of the POI on the list then the map will open up and show them where the bridge is, with a zoom feature.
![]() = Low
Bridge on your route. These are Low Bridges that if you select your cab
height (above) then these will cause you problems. Otherwise they are
just bridges that are on your route.
= Low
Bridge on your route. These are Low Bridges that if you select your cab
height (above) then these will cause you problems. Otherwise they are
just bridges that are on your route.
![]() = Low Bridge
is near to your route, a small diversion will take you to the bridge.
= Low Bridge
is near to your route, a small diversion will take you to the bridge.
![]() = Low Bridge
is not on your route or near to it. A large diversion off route would be needed to
come up against it
= Low Bridge
is not on your route or near to it. A large diversion off route would be needed to
come up against it
Only the straight green arrows
![]() indicate
anything that will definitely cause a problem on your route. If
you use the cab height POI then each green arrow is a bridge that you
cannot go under.
indicate
anything that will definitely cause a problem on your route. If
you use the cab height POI then each green arrow is a bridge that you
cannot go under.
If you click on a POI in the list you will get a map with the location, the zoom level depends on what level you last zoomed into. Use the slider bar at the side to zoom in and out and see the location. In our example we are zooming in on the A3015 Low Bridge at Honiton
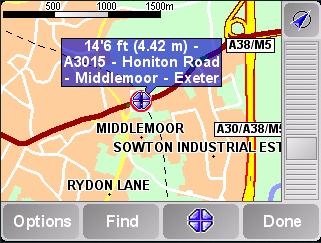
All the info about the Low Bridge is stored, to see it just click on a Bridge POI to open up a BLUE box with details inside. This is very useful when planning to avoid road segments. To locate more bridges just click on Find and then repeat the steps above.
Step 9: Using the tomtom to avoid Low Bridges on your route
You have your planned route and an idea of where the bridges are
located, now as you drive you want to avoid them. As you approach a Low Bridge you will hear and see the
alerts setup earlier in STEP 7 depending on the distances you set. If you hear a Cab Height warning
then this
tells you that the Bridge ahead is lower than your cab and you need to
divert as described in STEP 2:
When you hear the Cab Height warning (Point 2 in STEP 2: ) this means you must divert from the planned route because you will not fit under the Low Bridge.
 Click into
“Main Menu 1” and then select the “Find Alternative" icon which opens up the
following
Click into
“Main Menu 1” and then select the “Find Alternative" icon which opens up the
following
This is a very useful screen, the option we will be using here is the 'Avoid roadblock' click on it. If you want to know more about the other features then please see the troubleshooting guide.
![]() For
ease of use there are four presets
for the “Avoid Roadblock”. You estimate how far ahead the
“Blockage” is then select
the relevant option '100m', '500m', '2000m' or '5000m' . This diverts
you off the planned route and then back onto it at the next junction
which comes after the distance selected. The Low Bridge is
effectively a "roadblock" to the HGV, this feature is
used to route around it via another road
For
ease of use there are four presets
for the “Avoid Roadblock”. You estimate how far ahead the
“Blockage” is then select
the relevant option '100m', '500m', '2000m' or '5000m' . This diverts
you off the planned route and then back onto it at the next junction
which comes after the distance selected. The Low Bridge is
effectively a "roadblock" to the HGV, this feature is
used to route around it via another road
The cab height warning suggestion is triggered at 1500m, so if you
select a 2000m roadblock when you hear the warning you will easily avoid
the bridge.
Troubleshooting & Updates
We have an extensive troubleshooting guide included on the DOWNLOAD or CD ROM. To look at this use the nav-bar at the top and click on it. If you have a more complex query or are getting stuck at a particular point we would suggest that you try this section first for help. You can always contact us at helpdesk@hgvsolutions.com
Make sure you register for updates, we will contact you when an update is ready. This reminder will be sent via email, so ensure that we have a current and working email for you. If you don't send us one we will use the PAYPAL email you used when buying. If you have not heard anything for a while then then feel free to contact us to find out in case the emails are not reaching you.
Please don't forget to register yourself for support and updates - REGISTER
Licence Terms & Copyright click here: Licence & Copyright